Page 3 of 4
Re: My Translated Wiring Diagram - GK76a
Posted: Thu Jan 03, 2013 4:43 am
by Marsbar
aceofhearts wrote:Just looked at the airbox and can't see any sensors

I am starting to think there are a few bits missing from this bike

The 1st one has now been identified as the signal generator, but can't find that either

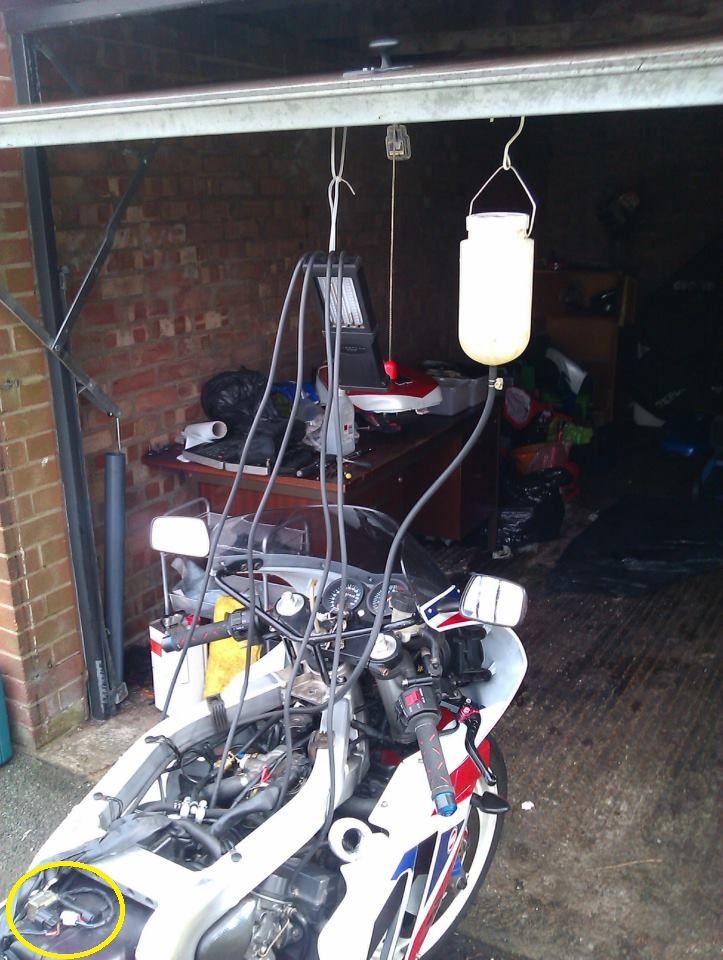
Bottom left of image in the yellow circle. can see it on the top of the box, the bit on top of the box is also used for the SP carbs as they have pressurized floats.
Ignore the white connector thats just the TPS sensor as i didnt have sp carbs at the time
Re: My Translated Wiring Diagram - GK76a
Posted: Thu Jan 03, 2013 5:56 am
by aceofhearts
Thanks for the reply, i definately don't have that airbox sensor so will have to order one up.
Also for the starter solenoid in the advert, I have one on the bike, but that definately doesnt have the connection for the black connector in my previous pic (pink / orange white wires)
I have been searching all night though and cannot see what else it can be
Re: My Translated Wiring Diagram - GK76a
Posted: Thu Jan 03, 2013 6:01 am
by aceofhearts
Ambient temp sensor powers a solenoid to pressurise carb diaphrams?
viewtopic.php?f=53&t=34358
Getting really confused now
To summarise (i think)
1st connector = Signal generator
2nd connector = Sidestand switch
3rd connector = Airbox ambient air temperature sensor (only thing left) but is a solenoid on wiring diagram
Re: My Translated Wiring Diagram - GK76a
Posted: Thu Jan 03, 2013 6:10 am
by aceofhearts
Another interesting thread:
viewtopic.php?f=53&t=33537
This mentions it as an airbox pressure sensor, and looking at the diagram it does indeed connect to the airbox and carbs.
Does this mean i have a set of SP carbs on a Non-SP bike? Does this make any difference?
Re: My Translated Wiring Diagram - GK76a
Posted: Thu Jan 03, 2013 6:23 am
by Marsbar
I think it would for the carbs as the floats are pressurized on the SP carbs and if you dont have that thing on top of the airbox then there will be no pressure in float bowls messing up the fueling, just a guess though :/
Does your The SP loom as the TPS sensor (white triangle) and 1 plug cdi, I ran the bike fine with normal carbs but i dont know if standard will run SP carbs well :/
VariableValves will prob be best asking.
am confused aswell

Re: My Translated Wiring Diagram - GK76a
Posted: Thu Jan 03, 2013 6:30 am
by aceofhearts
Lol glad i am not the only one.
Yes the CDI is just a single plug, and it does have a TPS which is plugged in fine.
I can see why the previous owner gave up on this project
ETA
Is that the guy that sells the O-ring kits, i need some of them as well
Re: My Translated Wiring Diagram - GK76a
Posted: Thu Jan 03, 2013 6:36 am
by Marsbar
Hehe don't give up
so just need the thing on top of air-box?
Carn't remember if its part of the main air-box (molded) or separate.
I dont think the airbox can be removed with the engine in place also :/
Re: My Translated Wiring Diagram - GK76a
Posted: Thu Jan 03, 2013 6:41 am
by aceofhearts
The bike came in a couple of bits so the airbox was seperate and exhaust removed (i guess atleast i know the studs arent stuck!)
Looks like he may have changed the carbs and loom / CDI over but still has the original airbox (a possibility i guess)
I can see this being a total PITA as i suspect i don't have any of the correct hoses for it either

Anybody want a cheap GSXR400 Project?
Re: My Translated Wiring Diagram - GK76a
Posted: Thu Jan 03, 2013 7:06 am
by Marsbar
If your looking for an easy way, sell the SP carbs and get normal, the SP carbs are quite rare.
I have 2 gsxrs in shed both sp looms but only 1 has the sp carbs :/ track bike has normal both run good.
Re: My Translated Wiring Diagram - GK76a
Posted: Fri Jan 04, 2013 1:14 pm
by Variablevalves suck
On the SP the carb float bowls have pipes running up to a valve on top of the airbox, this is switch by the tps (i think) and pressurizes the carbs.
Its easy to see if the airbox has this fitted as its right on the top and about 1" squre with the two pin connector.