Can you see what it is yet
Forum rules
Please can you post items for sale or wanted in the correct For Sale section. Items / bikes for sale here will be removed without warning. Reasons for this are in the FAQ. Thanks
Please can you post items for sale or wanted in the correct For Sale section. Items / bikes for sale here will be removed without warning. Reasons for this are in the FAQ. Thanks
-
Evilchicken0
- Site Supporter

- Posts: 5374
- Joined: Tue Apr 29, 2008 8:59 pm
- Bike owned: Bimota SB6 Yamaha FZR 3TJ x2
- Location: Lundin Taan
Re: Can you see what it is yet
Ok, well the rear subframe is painted and laquered ... and that dear readers is the end of a can of of black and laquer.
Pics of this ... later cos I forgot to take the camera with me.
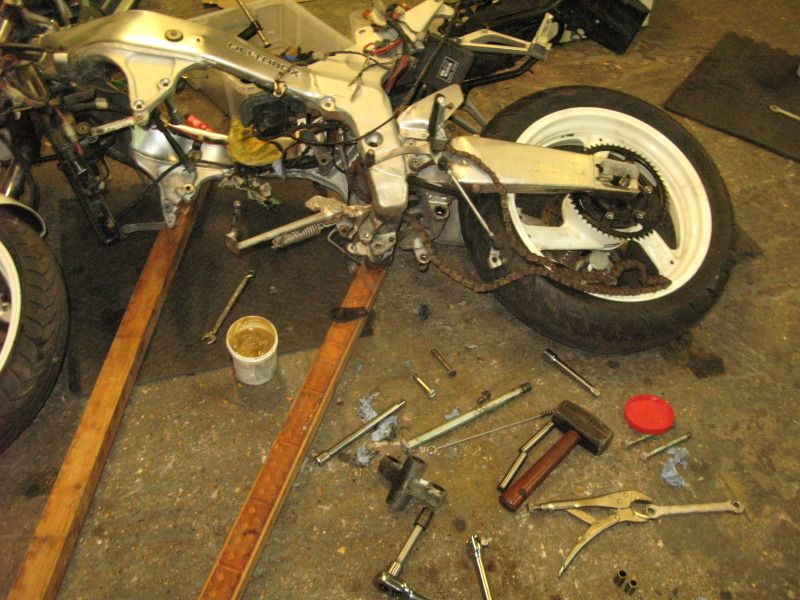
Next I will mostly be reducing what's left of the bike down to smaller big bits, so pass me the breaker bar
Pics of this ... later cos I forgot to take the camera with me.
Next I will mostly be reducing what's left of the bike down to smaller big bits, so pass me the breaker bar
-
Evilchicken0
- Site Supporter
- Posts: 5374
- Joined: Tue Apr 29, 2008 8:59 pm
- Bike owned: Bimota SB6 Yamaha FZR 3TJ x2
- Location: Lundin Taan
Re: Can you see what it is yet
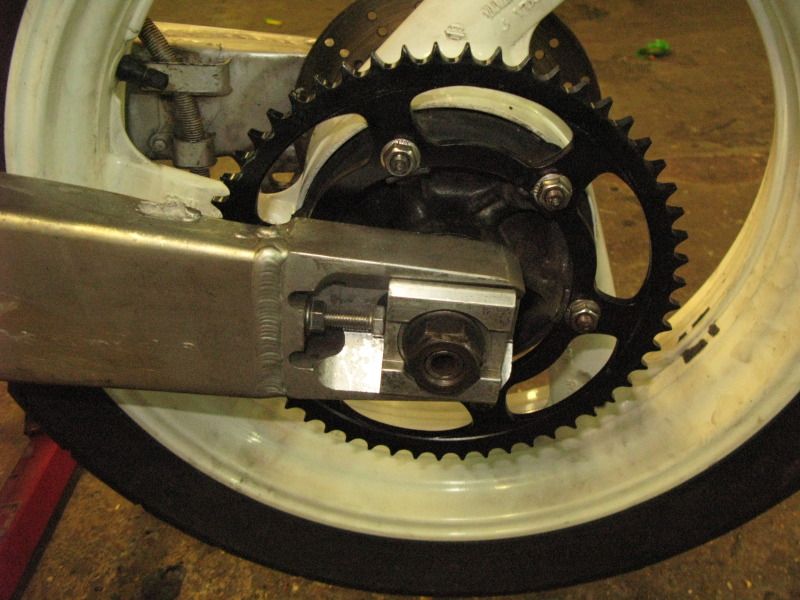
I said The bike had a dodgy front sprocket so here it is

I think the loose chain is what's marked the top of the swingarm ... and why the rear braket for the chain gaurd is broken off.
So onwards then.
I undid the rear shock mounts, the linkage and the swingarm pivot nut. Then laid the bike on it's side and took it all apart, cleaned and greased all the bearings. Put it all back stood it on the side stand and torqued the nuts up, that took a while, but it's a straightforward job and well worth doing especially if the engine's out.
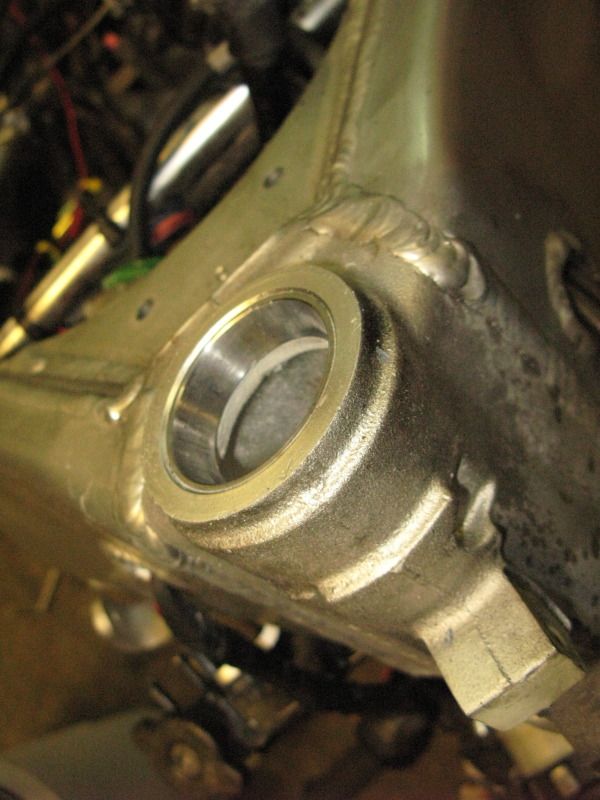
I wanderred to the other end, took the calipers off, the front wheel out, the top clamp off, and dropped the forks. I saw the castlated nuts had been undone before so I hoped the headrace bearings had been sorted, and luckily they had. Unluckily they didn't grease them when they put them in so now they're junk. For a while I though I thought I might save them and cleaned the top race with autosol, then I looked at the bottom one So I've orderred a set up.
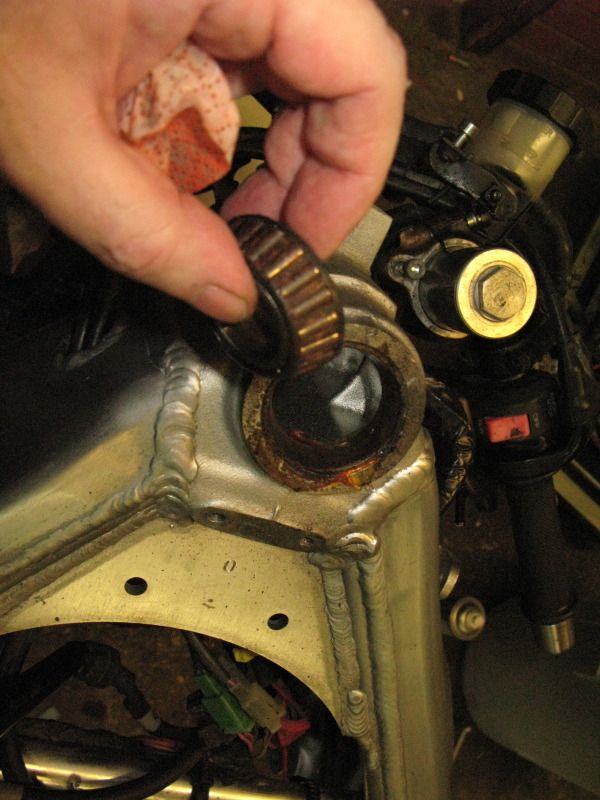
After a bit of thwapping the lower bearing came off the stem.
I painted the bottom clamp.
I think the loose chain is what's marked the top of the swingarm ... and why the rear braket for the chain gaurd is broken off.
So onwards then.
I undid the rear shock mounts, the linkage and the swingarm pivot nut. Then laid the bike on it's side and took it all apart, cleaned and greased all the bearings. Put it all back stood it on the side stand and torqued the nuts up, that took a while, but it's a straightforward job and well worth doing especially if the engine's out.
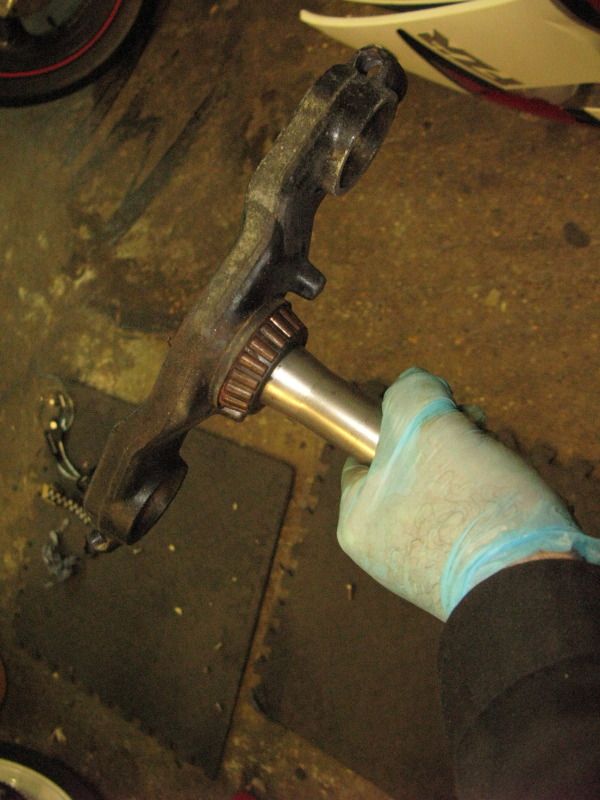
I wanderred to the other end, took the calipers off, the front wheel out, the top clamp off, and dropped the forks. I saw the castlated nuts had been undone before so I hoped the headrace bearings had been sorted, and luckily they had. Unluckily they didn't grease them when they put them in so now they're junk. For a while I though I thought I might save them and cleaned the top race with autosol, then I looked at the bottom one
After a bit of thwapping the lower bearing came off the stem.
I painted the bottom clamp.
-
rockTJ
- Settled in member
- Posts: 207
- Joined: Sat Mar 31, 2012 3:43 pm
- Bike owned: GSX650F FZR250x2 RSV RG80
- Location: Southend-on-Sea
Re: Can you see what it is yet
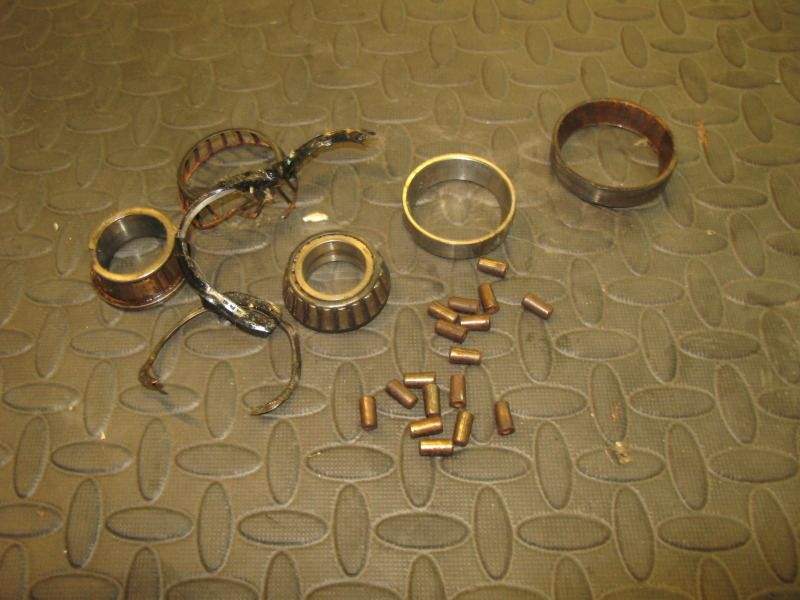
I was dreading doing the head bearings on my 3TJ. The last set I did on a 350LC were a nigtmare to replace. They were knackered tapers and the bearing edge was flush top & bottom.
Thank christ in the 3TJ there are two notches on the outer bearing seats for you to get a proper wallop on them
My 3TJ build is now at the point where £££ dictates speed of build - oh well
You going to out that one when it's done or track day it???
Chris
Thank christ in the 3TJ there are two notches on the outer bearing seats for you to get a proper wallop on them
My 3TJ build is now at the point where £££ dictates speed of build - oh well
You going to out that one when it's done or track day it???
Chris
-
Evilchicken0
- Site Supporter
- Posts: 5374
- Joined: Tue Apr 29, 2008 8:59 pm
- Bike owned: Bimota SB6 Yamaha FZR 3TJ x2
- Location: Lundin Taan
Re: Can you see what it is yet
Yes knocking the races out is easy (as long as you have a drift long enough. The bottom bearing is a bit more difficult but once you've moved it off the lower clamp it's easy enoungh.
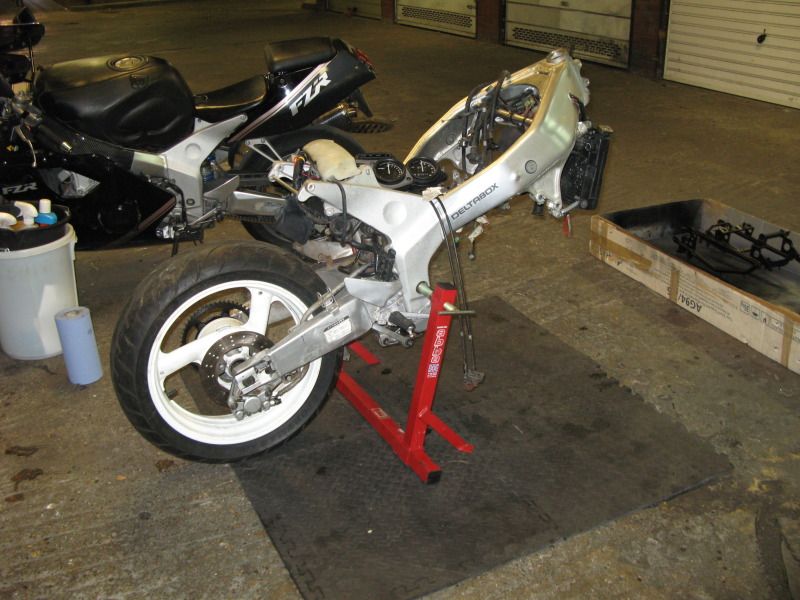
The "bike" yesterday
Bearings are orderred - I got sealed bottom one.
I'll sell this one on. there isn't enough room in my garage for 3 bikes and I don't ride the other two that often, I kinda enjoy the spannering though and I've got more confidence since the college course.
The "bike" yesterday
Bearings are orderred - I got sealed bottom one.
I'll sell this one on. there isn't enough room in my garage for 3 bikes and I don't ride the other two that often, I kinda enjoy the spannering though and I've got more confidence since the college course.
-
Evilchicken0
- Site Supporter
- Posts: 5374
- Joined: Tue Apr 29, 2008 8:59 pm
- Bike owned: Bimota SB6 Yamaha FZR 3TJ x2
- Location: Lundin Taan
Re: Can you see what it is yet
Well with not much else to do I thought I'd have a look at the tank, well tanks there are 2.
The first is a bit rusy inside, it still had petrol in there when I got the bike. The second had some sealant in there at some point but now it just looks "crispy", well I assume it's sealant.
I got some stuff that you mix with water and leave in for 12 hours, I chose to do that to number one and it's currently in the bath ... Mrs Evil is watching tv atm ... she hasn't been in the bathroom yet
Anyway I got a drill extension and some wire wheels to get as much as I could out - then I noticed a hole ... um. Anyway I had a poke about and found 2 others, they have some plumbers putty in them with pacel tape to stop the leaks.
Bugger we've been rumbled ... gotta go
-
rockTJ
- Settled in member
- Posts: 207
- Joined: Sat Mar 31, 2012 3:43 pm
- Bike owned: GSX650F FZR250x2 RSV RG80
- Location: Southend-on-Sea
Re: Can you see what it is yet
Chemical metal is your friend............. 
Chris
Chris
-
Evilchicken0
- Site Supporter
- Posts: 5374
- Joined: Tue Apr 29, 2008 8:59 pm
- Bike owned: Bimota SB6 Yamaha FZR 3TJ x2
- Location: Lundin Taan
Re: Can you see what it is yet
Got a mate saying drop a bit of weld on it but that will probably make it worse ... brazing will fuck the paint so I think you're probably right. I'll need to clean the metal back and then do a "cold repair".
Looked at the tank this morning and the inside of the cap looks cleaner, the water inside is moving around on it's own and is darker coloured so fingers crossed it's doing it's thing.
The second tank looks better structurally so if this stuff works I can clean it out inside so it might end up usable.
The other thing though is the fuel cap will open with either key so I reckon the locks been forced or the springs on the cylinders are gummed up .... that lock set on the bay might be the way to go if I'm looking to replace the cap and find a pillion seat lock too.
-
Hogdigerdy Dog

- Site Supporter
- Posts: 545
- Joined: Mon Sep 14, 2009 6:34 pm
- Bike owned: FZR400RR 3TJ, ZX9R fighter
- Location: Dorsetshire
Re: Can you see what it is yet
hope the acid bath works, always does for me,
you might find that once you empty the tank out it will get a thin layer of surface rust (more like dust really) as the acid will take it back to bare metal but is water based, so give the tank a good dry out (hair dryer is good, but don't tell her indoors)
as for the holes, liquid metal or JB weld is good (have not had good experiences with the aroldite version it's shit) but if there only tiny holes, i found the best way was to take a punch and make a small dent around the hole(4/5mm) then score the indentation with the blade of a stanley, this gives the glue something the adhere too and makes rubbing back easier for an invisible finnish
if it's gonna be stood for a while you can stop the rust in the tank by putting 1/2 pt of 2T mix in, give it a shake then drain out, this will put a thin layer of oil on the inside of the tank, but only in the short term as the oil will dry out over the months and varnish the tank, sender and tap, meaning you gotta clean it again
-
willandrip
- Site Supporter
- Posts: 983
- Joined: Sun Aug 14, 2011 8:33 am
- Bike owned: Far, far too many now
- Location: North Tyneside Tyne and Wear
Re: Can you see what it is yet
Not for Boris specifically but rather a few general tips.....Evilchicken0 wrote:A guy in the garage complex was telling me how I could cut a small slot or use an impact driver (but the allen head was already rounding) I just said "nah mate, angle grinder" .... and had it done by the next day. A grinder is ok if you don't want to mark the disc or disc carrier
Next size up "star bit" TORX persuaded into rounding out hex is an easy "fix".
1= No need to plug yet another electric tool in.
2="Persuasion" shocks thread on loctited from factory cheese cap bolts as will a hot air gun (hairdryer) or gas torch played on inserted allen key (heat transfer without marking finish) boiling water also softens loctite.
3= At last you use those TORX bits that come with every bit set and you have no use for---- except the helmet lock mount!!!!!!.
4=Cap screw may be re-used until replaced.
N.B. If cap screw is a special, hard to source item=
1- Cut back allen key about 4mm (working end becomes rounded over time.)
2-Use next size up imperial key on metric cap screw. (fractionaly larger)
When using an Allen wrench,tap it home sharply to ensure seating and to shock threads.
An L shaped key slips very easily due to lop-sided torque.
On anticipated siezed solid cap screws judicious use of a correct sized drift inside the cap head is acceptable.
Buy decent quality Allen keys initially. Ive got a Wurth T handle set from 1975 that have never failed and are just about ready for "cutting back" now !!!!!!!!!!!
A red box doth not a Snap On make.
-
Evilchicken0
- Site Supporter
- Posts: 5374
- Joined: Tue Apr 29, 2008 8:59 pm
- Bike owned: Bimota SB6 Yamaha FZR 3TJ x2
- Location: Lundin Taan
Re: Can you see what it is yet
True I could have an impact driver ... but it's not as glamourous and I get to wear goggles !!!
So the tank - bloody hell that stuff works Comscale 650 - I used 2 litres and mixed it in the tank with hot water and left it for 24 hours. Then I flushed it out with lots of cold water then finally a kettle of bioling water. Yup I used the Mrs hairdryer and finally sat down with a little phillips screw driver and tested all the rust spots, some were probably 50/50 but I've pushed them in anyway I'll clean and fill them tomorrow. I use engine oil with a bit of petrol to oil the tank but I guess 2 smoke will be just as good (and burn a little easier).
Bought that lockset, a loom and some bar grips, got some braided hoses from Thunderace too.
I think I've got most of the bits now apart from some downpipes, but there's still a lot of building to go.
So the tank - bloody hell that stuff works
Bought that lockset, a loom and some bar grips, got some braided hoses from Thunderace too.
I think I've got most of the bits now apart from some downpipes, but there's still a lot of building to go.